Welcome to Undelete Server
The Undelete® Server software includes powerful features and components to provide real time data protection enabling you to recover accidentally deleted files very fast.
This article is for you if you have purchased the Undelete software, are using the 30-day trial software, or are considering adding Undelete Server to cover the gaps in your data protection strategy to provide instant file recovery. This article is divided into 3 parts:
Part 1: Overview of Features & Components in Undelete Server
Part 2: Using Undelete Server
Part 3: How to Do Specific Tasks with Undelete Server
Part 1: An Overview of The Features and Components in Undelete Server
- Recovery Bin
Recovery Bin
The Recovery Bin feature is similar to the Windows Recycle Bin. Deleted files aren’t really deleted—they’re simply moved to the bin and held there until the bin is “emptied” or purged.
This allows you to recover files easily after they have been deleted — so recovering these “deleted” files is only a few mouse clicks away.
However, the Recovery Bin differs from the standard Windows Recycle Bin in several important ways:
- It allows you to recover files deleted by any method, including Windows Explorer and other applications—even files deleted from the Windows command prompt!
- You can have a Recovery Bin for any individual disk volumes on your computer, or use a single, “common” Recovery Bin for all your disk volumes–even on Cloud Storage services such as Microsoft OneDrive.
- When files are “deleted” and moved by Undelete into the Recovery Bin, they are displayed in a manner very similar to Windows Explorer. You (or your users) can see and recover the deleted files and the folders as easily as browsing for “normal” files.
- The Undelete Server and the Desktop Client component of Undelete allow you to see the contents of the Recovery Bins on remote computers running Undelete Server Edition, allowing you or your users to recover “deleted” files across your network (typically from network file servers). This feature alone is a “life saver” for many System Administrators and Help Desk technicians. It’s no longer necessary to search backup when a network user accidentally deletes a file from the file server.
There are actually two different ways you can recover deleted files from remote Recovery Bins: Mapped share access and node-to-node access.
Computers running Undelete Server or Client can access deleted files from mapped network shares (if the computers where the shares reside are running Undelete Server Edition). Computers running Undelete Server have the added capability of being able to access the full Recovery Bin on remote computers running either Undelete Professional Edition or Undelete Server Edition.
Note: You must have adequate permissions and ownership of a file in order to recover it from the Recovery Bin.
To view the contents of the Recovery Bin, double-click the Recovery Bin icon on your desktop. The files shown in the Recovery Bin display are files that have been deleted by any of a variety of methods, including the Windows File Explorer, or any other application capable of deleting files. It also includes files deleted via the Windows command prompt. (Note, however, that long filenames may be shortened to the DOS 8.3 file naming convention when files are deleted from the command prompt.)
You can have more than one Recovery Bin on your computer. Recovery Bin Properties (Settings menu > Properties ribbon icon > Global Settings tab) let you can specify individual Recovery Bins for each disk volume.
Or you can use one common Recovery Bin for all drive volumes—and even have the common Recovery Bin files sync to the Cloud through a Cloud Storage service such as Microsoft OneDrive. Undelete supports a common Recovery Bin on OneDrive by designating the Bin to be located on the OneDrive local Sync folder location. This is typically located on the C: drive under the C:\Users folder under the User’s profile folder, e.g., C:\Users\{user’s profile folder name}\OneDrive.
To set a single Common Recovery Bin for all drives, click the Settings menu > Properties ribbon icon > Global Settings tab > set “Use one Recovery Bin for all drives”. Designate the Recovery Bin location by selecting the drive and entering the full path under the Common Bin tab.
See below for more information on setting up a common Recovery Bin.
Search Feature
The Search Recovery Bin feature is designed to help you find the file you want to recover from the Recovery Bin, as the Recovery Bin may contain thousands of “deleted” files.
A Search feature for deleted files not saved in the Recovery Bin is also available.
See below for more details under Using the Search Feature.
Version Protection for Microsoft Office and Other Files
This powerful feature allows Users to recover previous versions of almost any file type, including the ability to restore an opened file before edits began.
Undelete captures commonly-used Microsoft Office files when they are overwritten during a save operation. By default, Undelete Server captures versions of Microsoft Word, Excel and PowerPoint files, but additional file types can be added as needed to allow you or your users to recover previous versions of just about any type of file.
Undelete also supports copy to the Recovery Bin on first write for an opened file that has a file type designated for versioning. Undelete captures the first write to the disk for these files. This provides the User the ability to restore the initial state of the file before edits began.
Other file types can easily be added via the Settings menu > Properties ribbon icon > Versions tab.
Emergency Undelete
Emergency Undelete is a separate utility included with Undelete Server used to recover accidentally deleted files before installing the full Undelete product. Since installing software on a computer can overwrite deleted files and make them unrecoverable, Emergency Undelete runs directly from a removable storage media (such as a CD-ROM or thumb-drive) without any installation.
Important!
Once a file is deleted, the chances of fully recovering that file decrease considerably when other activity occurs on the same disk volume. To improve the possibility of a complete recovery of a file that has been accidentally deleted, Condusiv Technologies recommends the following steps:
- Stop all activity on the disk volume where the accidentally deleted file resided. Do not save any files that are currently open, since this causes a write operation on the disk.
- If the computer is on a network, disconnect the network cable if possible. This prevents disk activity caused by remote users from writing over the file you want to recover. (Keep the network cable connected if you want to recover the file to a disk volume on are mote computer.)
- After Emergency Undelete has located the file, recover the file to a local or remote disk volume other than the volume from which the file was recovered. This prevents the deleted file from accidentally being written over by the write operation of the recovery process.
Note: On FAT volumes, files with short names (8.3 format) that have really been deleted will have the first character of the filename replaced by a tilde (~). For example, a file named test.txt, when deleted, will be renamed to ~est.txt and will be displayed that way in the Emergency Undelete windows.
See for more information about Emergency Undelete.
SecureDelete
There may be times when, due to corporate security policies or personal preference, you need or want files to be completely erased. The SecureDelete feature in Undelete provides this capability.
When enabled, SecureDelete not only deletes the file, but it overwrites the disk space the file previously occupied, thereby removing any remaining traces of the file left on the disk. This is done by overwriting it with a specific bit pattern specified for this purpose by the National Security Agency (NSA) for the Department of Defense (DOD).
Finally, after the file has been overwritten, it is deleted. The SecureDelete procedure makes it virtually impossible for anyone to access sensitive file data from a disk after it has been deleted from the Recovery Bin.
The SecureDelete option can be set to overwrite files as they are purged from the Recovery Bin, or immediately as they are deleted.
See for more information about the SecureDelete feature.
Wipe Free Space
Similar to the SecureDelete feature, the Wipe Free Space feature will overwrite any free space on the selected disk volume with a specific bit pattern, making it virtually impossible to read or recover any data that was previously written in the free space.
See for more information about the Wipe Free Space feature.
Undelete Desktop Client Component
The Undelete Desktop Client component, which is used with Undelete Server Edition, allows you (or more importantly, your users) to find and recover deleted files from remote Recovery Bins, such as those on a file server. The Undelete Desktop Client operates similarly to the Recovery Bin interface in Undelete Professional Edition, except it only “sees” Recovery Bins on remote systems. It does not have a “local” Recovery Bin where deleted files are stored. Users are only shown and allowed to recover files on shared network drives for which they have sufficient ownership or system privileges. NTFS permissions are applied and users will not be able to restore data from file shares they do not have permission to.
The Undelete Desktop Client saves time and trouble for System Administrators and Help Desk personnel by enabling users to recover their own deleted files from remote file servers. Undelete Server includes unlimited Desktop Client licenses.
Part 2: Using Undelete Server
Using the Undelete Server Recovery Bin to Recover Files
The Undelete Recovery Bin interface contains four menus: File, Home (the default menu), Tools, and Settings.
The Home, Tools, and Settings menus each contain a Ribbon Icon bar. Hovering over a Ribbon bar icon or button will show a brief description of what the icon / button does.
The User may elect to add any of the Ribbon icons into the Quick Access menu (located in upper-left of the Undelete Window Title bar) by right-clicking on the icon and choosing “Add to Quick Access Toolbar”.
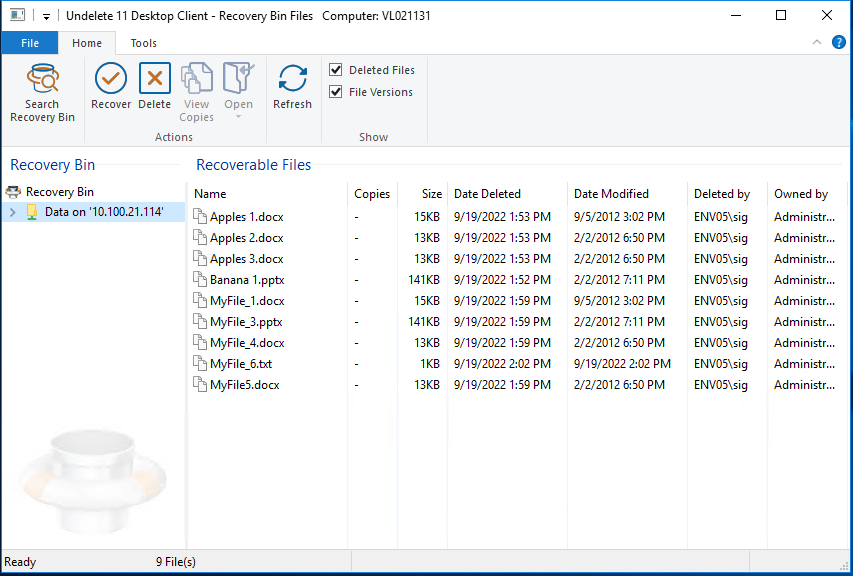
Below the Ribbon Icon bar is the Recovery Bin, which gives a folder view of the location of captured deleted files.
The Recoverable Files section to the right of the Recovery Bin shows the files that can be recovered. The default view is to show Deleted Files and File Versions. The User can choose to toggle the Deleted Files and File Versions buttons in the Show section of the Ribbon bar in the Home menu.
Recovering Files
Recovering a file or file version to its original location is a simple process:
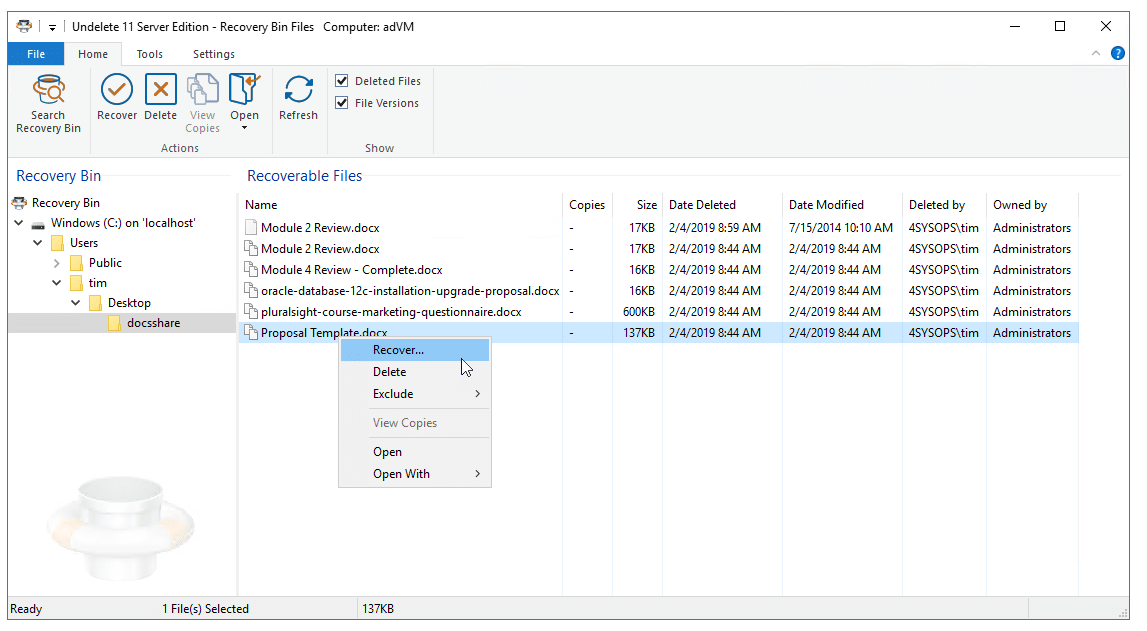
In the Recovery Bin folder section, highlight the folder of interest that has files to be recovered.
Highlight one or more files in the Recoverable Files list, and click the Recover ribbon icon in the Home menu, or right-click the highlighted file(s) and choose Recover:
The default Recovery location is shown in the Recover to field. Click OK recovery the file(s) to their original folder location:

To recovery the file(s) to a different location, double-click the double-dots directory icon, and navigate to the desired location, and then click OK to recover the file(s):
Alternatively, if you have Windows File Explorer open you can simply drag and drop the selected files into a File Explorer folder (Including the User’s Desktop).
Opening Files Prior to Recovering Them
The User may choose to open files to inspect their contents prior to recovering them.
This can be done in several ways, depending on whether the file has any Copies in the Recovery Bin.
A highlighted file without Copies can be opened with its associated application by:
- Double-clicking the file
- or clicking the Open icon in the Actions section of the Ribbon bar
- or right-clicking the file and choosing Open
A highlighted file that has Copies can be opened from the View Copies dialog box.
The View Copies dialog box will open when the User either:
- Double-clicks a file with Copies
- or clicks the View Copies icon in the Actions section of the Ribbon bar
- or right-clicks the file and chooses View Copies
In the View Copies dialog box, the User can open each copy with its associated application by double-clicking it, or by right-clicking on the copy and choosing Open. Alternatively, the User may choose the program to open the file by right-clicking on the copy and choosing Open With, and then selecting Choose Program.
Undelete Server Recovery Bin Properties—Settings
Use the Settings menu > Properties ribbon icon to access the Recovery Bin Properties and Settings.
Within the Recovery Bin Properties dialog box, you can manage the settings for individual drive volume Recovery Bins or common Recovery Bins.
This includes:
- Global Settings that apply to all Recovery Bins – Individual Recovery Bins versus a Common Recovery Bin; SecureDelete all files immediately; enable/disable Recovery Bins; sizing rules for Recovery Bins; enable/disable the saving of deleted zero length files; enable/disable Recovery Bin Virus Protection; enable/disable the ability to turn on SecureDelete on purge for Recovery Bins; enable/disable the “Confirm each delete from the Recovery Bin” warning.
- Versions – Enable/disable saving of file versions; specify the number of versions saved per file; specify the file type extensions that will be saved in the Recovery Bin as versions.
- Common Bin – Specify the location of the Common Bin; specify its size; enable/disable feature to purge files older than a specified number of days.
- Individual drive volume Recovery Bin settings – Enable/disable Bins; set Recovery Bin size; enable/disable feature to purge files older than a specified number of days; enable/disable Automatic Wipe Free Space feature.
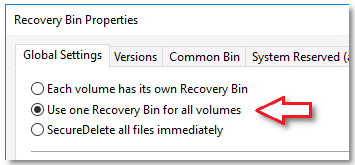
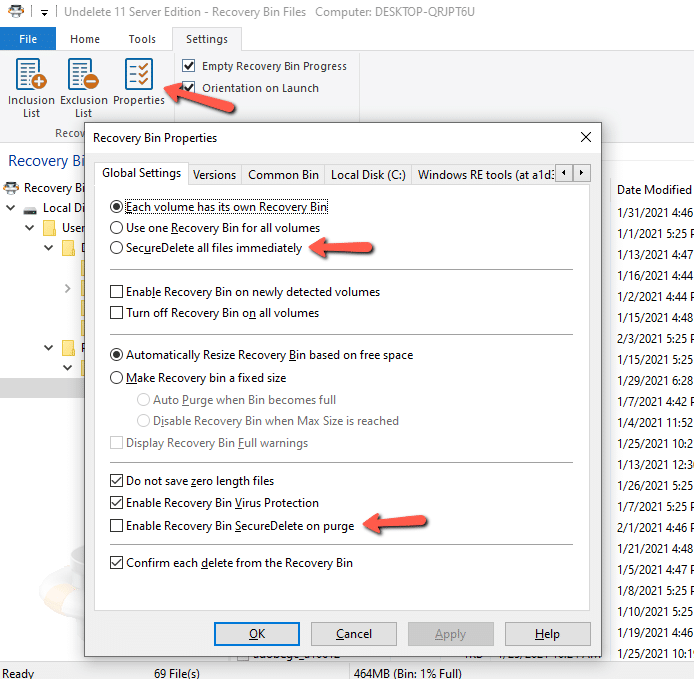
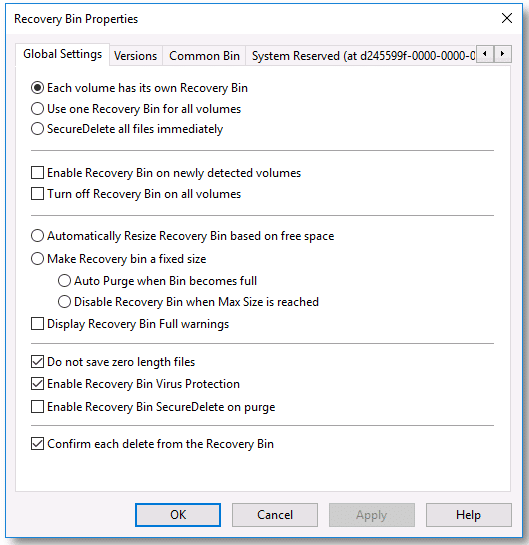
Global Settings Tab

- Each volume has its own Recovery Bin or Use one Recovery Bin for all volumes – Set whether each drive volume has its own Recovery Bin or whether a common Recovery Bin is used for all volumes.
- SecureDelete all files immediately – Enabling this and clicking OK will cause Undelete to run SecureDelete immediately on all files in all Recovery Bins. This action is not reversible. Once the cycle has completed, even the Search feature will not be able to recover files.
- Enable Recovery Bin on newly detected volumes – This is turned off by default.
- Turn off Recovery Bin on all volumes – There may be times when the User wants to temporarily turn off all Undelete Processing of deleted files. This is the setting to do that.
- Automatically Resize Recovery Bin based on free space – Turned on by default to best support the changing nature of free space on User systems.
- Make Recovery Bin a fixed size – Turned off by default. When enabled, it has two mutually exclusive options: Auto Purge when Bin becomes full, and Disable Recovery Bin when Max Size is reached. Additionally, when this is turned on the option to also Display Recovery Bin Full warnings is available.
- Do not save zero length files – Turned on by default. There are times when the Operating System and applications will create a files that do not have any contents in them—such as temporary files. Not saving these files to the Recovery Bin saves time and processing overhead.
- Enable Recovery Bin Virus Protection – Turned on by default.
- Enable Recovery Bin SecureDelete on purge – Turned off by default. Turn on this setting to allow the SecureDelete feature to be available for Individual drive volume Recovery Bins. Note that when this is enabled, all individual Recovery Bins will be set to SecureDelete files from their volumes from that point forward. The SecureDelete feature can be disabled as needed on individual Recovery Bins however.
- Enable Automatic Wipe Free Space – Turned off by default to reduce processing overhead. Useful on secure systems that have to maintain a high level of security for deleted files. The wiping of free space will prevent the Search feature from being able to locate deleted files that are not in the Recovery Bin.
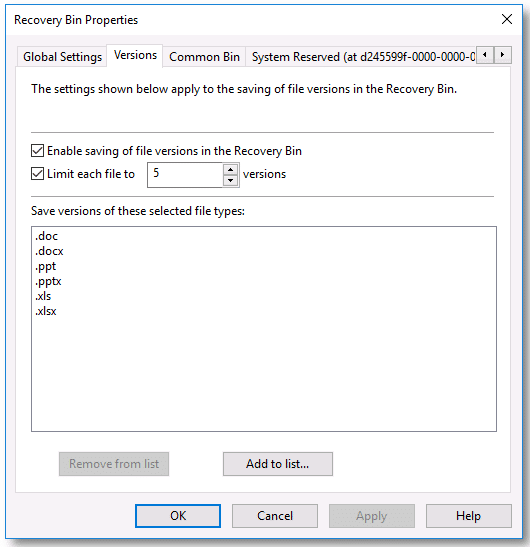
Versions Tab

- Enable saving of file versions in the Recovery Bin – Turned on by default. Allows the saving of designated file types as changes are made to an opened file during Saves.
- Limit each file to – Set to 5 by default.
- Save versions of these selected file types – By default, Microsoft Office file types for Microsoft Word, Excel, and PowerPoint are included, and additional file types can be added as desired.
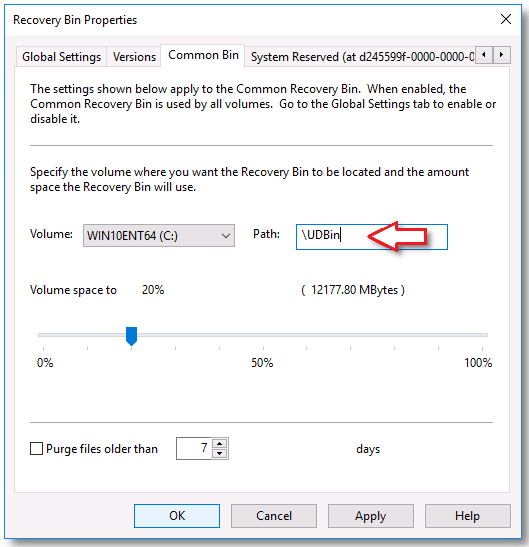
Common Bin Tab
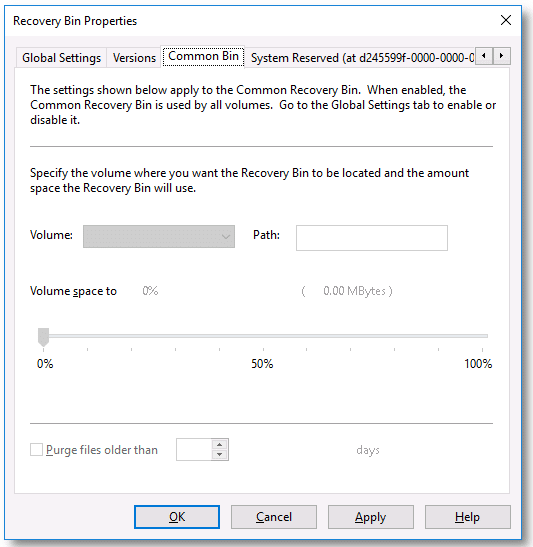
- Specify the Volume and Full Path where you want the Recovery Bin to be located – When the Use one Recovery Bin for all volumes setting in the Global Settings tab is enabled, the Volume pull down menu and Path fields become available to be set. The Path field needs to have the Full Path to the Common Bin specified.
- Recovery Bin will automatically resize to [X] percent of free space – Defaults to 20 percent, and can be adjusted up to 80 percent using the scroll controls or by changing the horizontal slider control.
- Purge files older than X days – Turned off by default but can be set to the desired number of days. When enabled, defaults to 7 days.
Individual Drive Volume Tabs
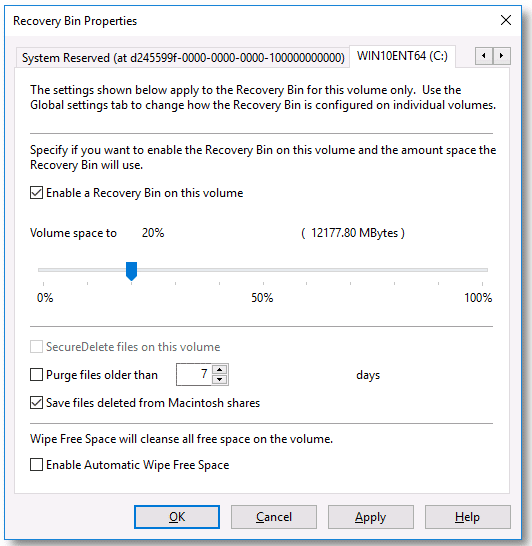
- Enable a Recovery Bin on this volume – This setting may be enabled by default if the User did not change the setting during the Undelete product installation. When enabled, saves files deleted from the selected drive so that they can be recovered at some point in the future. This applies to the individual Recovery Bin associated with this drive. This Recovery Bin may also be functioning as the Common Recovery Bin if this drive has been selected as the location for the Common Recovery Bin.
- Recovery Bin will automatically resize to [X] percent of free space – Defaults to 20 percent, and can be adjusted up to 80 percent using the scroll controls or by changing the horizontal slider control. This setting is only applicable when Automatically Resize Recovery Bin based on free space is selected in Global Settings. As the amount of available free space changes on the volume, so will the space used by the Recovery Bin. Undelete will automatically purge older files from the Recovery Bin as necessary.
- SecureDelete files on this volume – When the Enable Recovery Bin SecureDelete on purge setting is enabled in Global Settings this option becomes available to set. When active, it is turned on by default. It will cause the permanent erasure of any file deleted on the selected drive. The deleted file will not appear in the Recovery Bin or the free space of the disk—rendering it completely unrecoverable. Use this feature only when absolutely required, as it does involve a performance hit.
- Purge files older than X days – Turned off by default. When enabled, defaults to 7 days. Use this option to control when files will be purged from the Recovery Bin. If a file in the Recovery Bin is more than the specified number of days old, it will be purged. This setting applies to both Auto-Size and Fixed-Size Recovery Bins.
- Save files deleted from Macintosh shares – Turned on by default. This option causes files deleted from SFM shares to be saved in the Recovery Bin (as long as the file is not on the Exclusion list). When this option is not enabled, files from Windows Services for Macintosh (SFM) shares are not saved in the Recovery Bin. We recommend leaving it enabled unless deletion performance on SFM shares is critical to your operation.
Using SFM, it is possible to make one or more shared folders or disks visible to Macintosh computers on your network. Special actions are required by Undelete to save files deleted from these shares. The actions needed to copy these files into the Undelete Recovery Bin involve more work and time than a normal file deletion, and thus Macintosh file deletions from SFM served shares may take more time. There is no impact to local files deleted from the Macintosh or to files on non-SFM shares on the server.
- Enable Automatic Wipe Free Space – Turned off by default. Useful on secure systems that have to maintain a high level of security for deleted files. Enable this option to keep the free space clean by wiping on a periodic basis going forward.
Auto-Wipe Free Space will overwrite free space on the selected volume with a specific bit pattern, making it virtually impossible to recover any data that may reside in the free space. It leaves the Recovery Bin intact and functioning, and wipes the free space clean.
The wiping of free space will prevent the Search feature from being able to locate deleted files that are not in the Recovery Bin.
Undelete Server Common Recovery Bin
The Common Recovery Bin is a single Recovery Bin, which is used to save deleted files from all applicable drive volumes, rather than having a separate Recovery Bin for each drive volume.
The common Recovery Bin has Cloud support. It can be setup as a subfolder within a local sync folder of a Cloud Storage service such as Microsoft OneDrive.
Enable a Common Recovery Bin
- Click the Properties ribbon icon in the Settings menu.
- In the Global Settings tab, change the selection to “Use one Recovery Bin for all volumes”. Click the Apply button.
- In the Common Bin tab:
-
- Select the Volume where the common Recovery Bin will be located.
-
- Enter the Full Path to the desired common Recovery Bin folder. For example, \UDBin.
-
- Set the “Recovery Bin will automatically resize to” size as a percentage of the volume’s free space. This can be done by adjusting or entering a number less than or equal to 80 percent in the box provided, or by sliding the control to the desired percentage. The default Common Bin size is 20% of the volume’s free space.
-
- Optionally check the “Purge files older than” check box to set the number of days.
-
- Click OK:
Common Recovery Bin—Cloud Support
Undelete supports setting up a common Recovery Bin as a subfolder within the local sync folder of Cloud Storage services such as OneDrive.
The steps below outline how to setup a common Recovery Bin specifically for OneDrive, but similar steps can be taken to setup the common Bin for other Cloud Storage services that use a local sync folder.
Prior to managing the common Recovery Bin settings in Undelete, OneDrive must be setup with a new folder set to Sync with the Cloud.
As an example, this folder could be called UDBin and might be located in the User’s OneDrive Sync folder (e.g., C:\Users\{User_profile_name}\OneDrive\UDBin, where the specific User profile name would be shown).
Once OneDrive is setup with a folder set to Sync with the Cloud, the Properties for a common Recovery Bin can be set as above:
- Click the Properties ribbon icon in the Settings menu.
- In the Global Settings tab, select “Use one Recovery Bin for all volumes”. Click the Apply button.
- In the Common Bin tab:
-
- Select the Volume where the OneDrive Sync folder is located.
-
- Enter the Full Path to the OneDrive Sync folder. From the example above, this would be \Users\{User_profile_name}\OneDrive\UDBin.
-
- Set the “Recovery Bin will automatically resize to” size as a percentage of the volume’s free space. This can be done by adjusting or entering a number less than or equal to 80 percent in the box provided, or by sliding the control to the desired percentage. The default Common Bin size is 20% of the volume’s free space.
-
- Optionally check the “Purge files older than” check box to set the number of days.
-
- Click OK.
Important Notes:
- Undelete Server: Using a Common Recovery Bin on a network server will cause the deleted files on the server to be copied into a single location. If a large number of deletions take place on the network, this can add considerable I/O overhead. This overhead is apparent not only on the disk where the Common Recovery Bin is located, but also on the disk from where the files are being copied. For this reason, a Common Recovery Bin is not recommended on a busy server. Instead, enable the Recovery Bin individually on each drive.
- When you specify a single, Common Recovery Bin for all your volumes, files that had been previously been moved to the local Recovery Bins (the folders named \RecoveryBin\) will not be automatically moved to the Common Recovery Bin.
- Creating a Recovery Bin in the OneDrive Sync folder will use local storage space just like any OneDrive folder that is Sync’d with the Cloud does. The User needs to keep this is mind when setting up the Common Bin size Properties.
- If the User moves their local OneDrive Sync folder location, they will need to manually update the Path location in the Common Bin tab.
Using the Undelete Server Search Feature
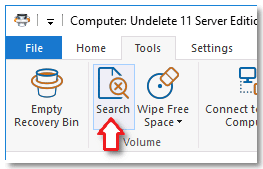
Access the Search feature from the Tools menu to recover files that have really been deleted and that are not located in the Recovery Bin.
This feature will search the Free Space on your system for the requested file(s).
Follow these steps to recover a file with the Search feature:
- Click on the Search ribbon icon under the Tools menu:
Specify the Name and Location of the file(s) for which you want to search. You can use wildcard characters (* and ?) in the Name field if desired:
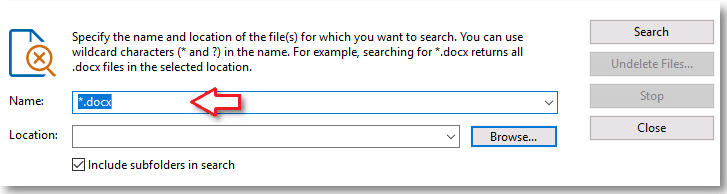
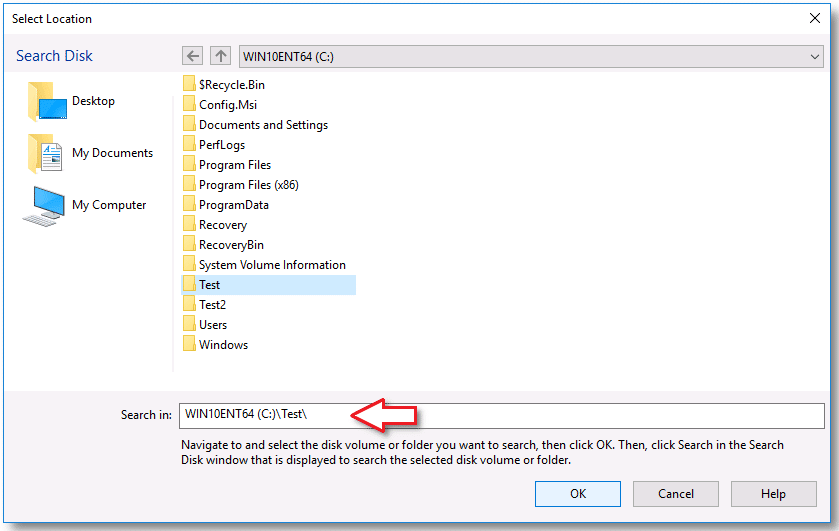
Press the Browse button to navigate to the location you wish to start the search from. Choose one of the location options on the left such as My Computer. Then either click the volume you want to start the search in, or double-click the volume to navigate to the desired sub-folder, then click OK:
Click the Search button to start the search for deleted files. A Stop button will become available at the right of the Undelete interface. Click Stop to stop searching for a file
- Available files matching your search criteria will appear in the Recoverable Files section. Highlight the name of the file (or files) you want to restore.
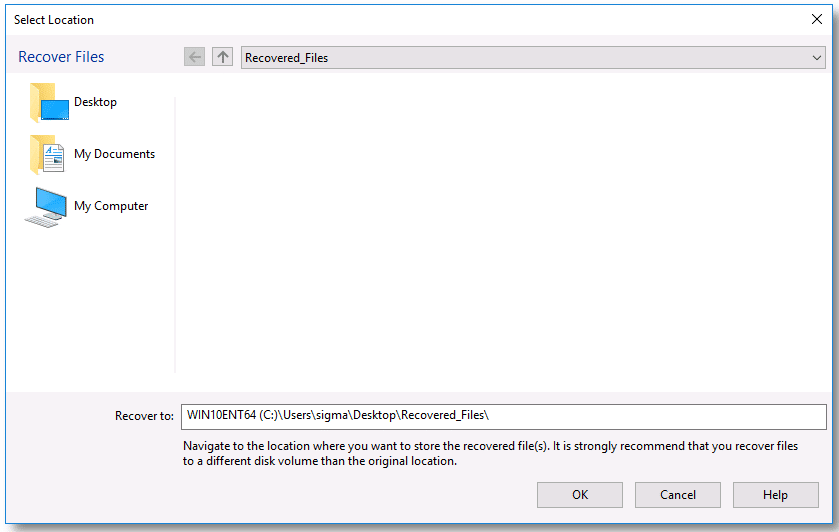
- Click the Undelete Files button. The default location that the file(s) will be recovered to is a folder called “Recovered_Files” on the User’s Desktop. Click Browse to select a different location:
The default Recovery method will put the file(s) in the indicated folder.
The User may choose to organize the file(s) using the names of the original folders, under the indicated folder.
- Click OK to restore the deleted files.
Important Notes:
- In order to avoid overwriting data in free space, it is recommended that you restore a recovered file to a location where there is little or no chance of overwriting the original information (such as on a different drive then where the file originally resided).
- The Dig Deeper feature cannot recover files that have been overwritten by other files. As a result, there may be cases where a file is not recoverable.
- In keeping with file security requirements, you must be a member of the Administrators group to undelete files directly from the disk.
Undelete also allows the User to search for files in the Recovery Bin itself.
Using Version Protection and Recovery
Have you (or your users) ever worked on an important document, presentation or spreadsheet, diligently saving your work as you go, only to discover that the changes you’ve made to the file are not workable, and you need to “rollback” to an earlier saved version?
Undelete automatically captures commonly-used or custom designated Microsoft Office files when they are overwritten during a save operation. Microsoft Word, Excel and PowerPoint files are supported by default.
In addition to Microsoft Office file types, Undelete allows the User to designate other file types to be saved to the Recovery Bin.
When you save a version protected file, the previous version is deleted as the new version is being written. Undelete captures these previous versions of the file and makes them available to you in the Recoverable Files section.
This powerful feature allows Users to recover previous versions of almost any file type, including the ability to restore an opened file before edits began.
Other file types can easily be added via the Settings menu > Properties ribbon icon > Versions tab.
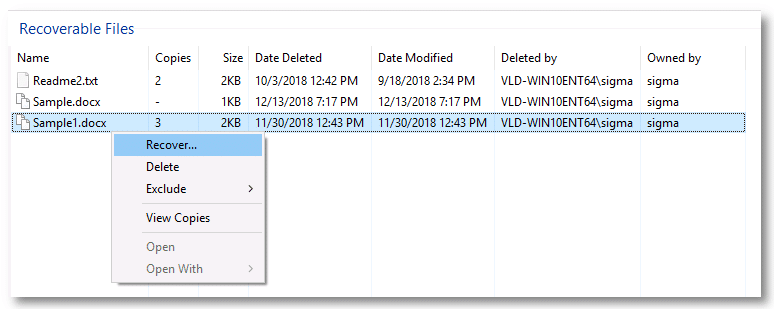
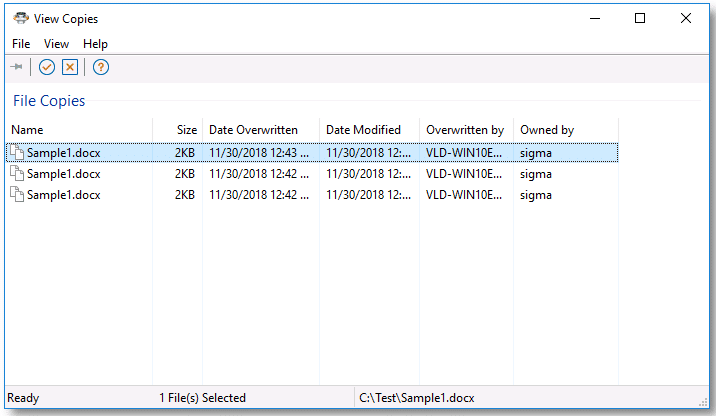
View Copies
When a file is deleted from a Windows folder that matches a file already saved in the Recovery Bin for the same folder, Undelete will indicate in the Recoverable Files list that there are File Copies available for the file:
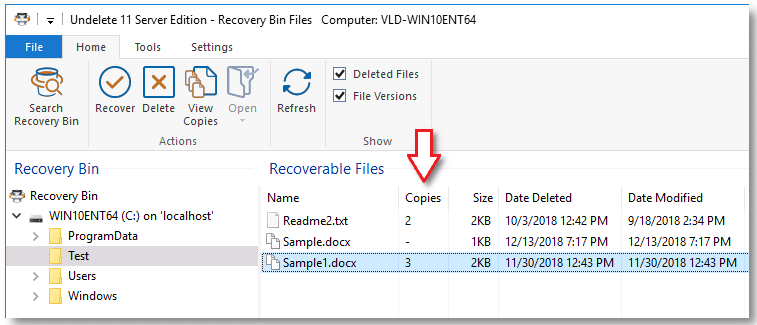
The User can view these file copies in advance using the View Copies feature to help determine which copy should be restored.
To see a list of the available file copies for a selected file in the Recoverable Files list:
- Double-click the file, or
- Click the View Copies ribbon icon located in the Home menu, or
- Right-click the selected file and choose View Copies.
A list of the available copies will then be shown along with the date and time that each copy was last modified, and overwritten:
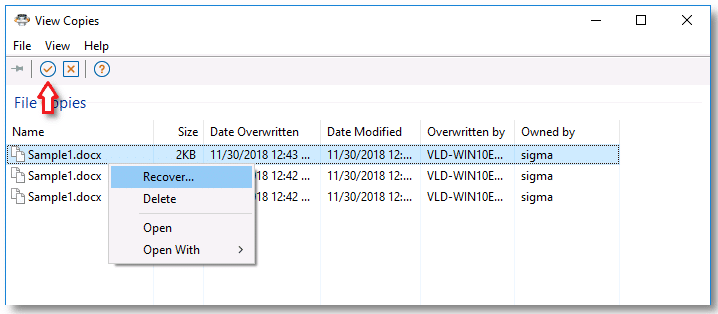
An individual file copy can be viewed with its associated application by:
- Double-clicking the file copy, or by
- Right-clicking the file copy and choosing Open, or by choosing Open With > Choose Program, to select the application used to open the file copy.
A selected file copy can be recovered by:
- Right-clicking the file copy and choosing Recover, or by
- Clicking the check icon located right below the menus:
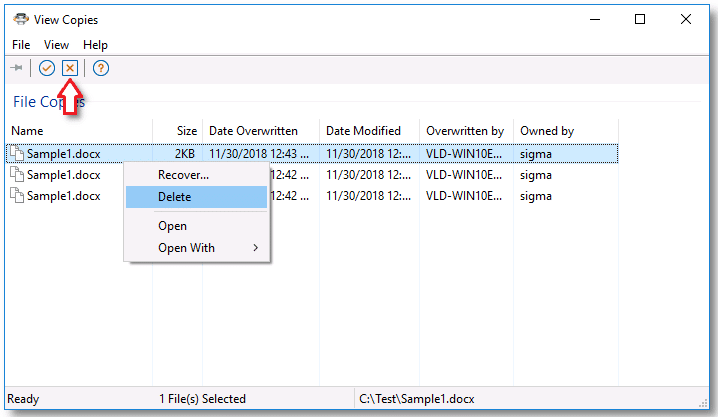
A selected file copy can be deleted if desired by:
- Right-clicking the file copy and choosing Delete, or by
- Clicking the X icon located right below the menus:
View File Versions in File Explorer
Undelete supports a right-click menu option for viewing File Versions in Windows File Explorer. If a selected file has File Versions saved in the Recovery Bin, the View Versions menu option will be available to right-click on:
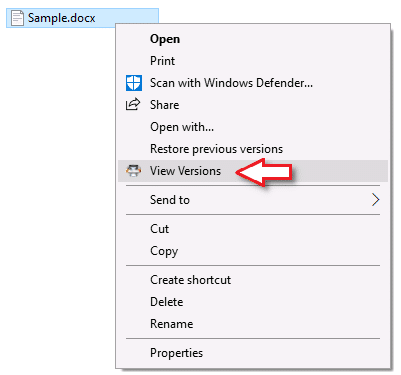
This will open Undelete and display the available versions saved in the Recovery Bin.
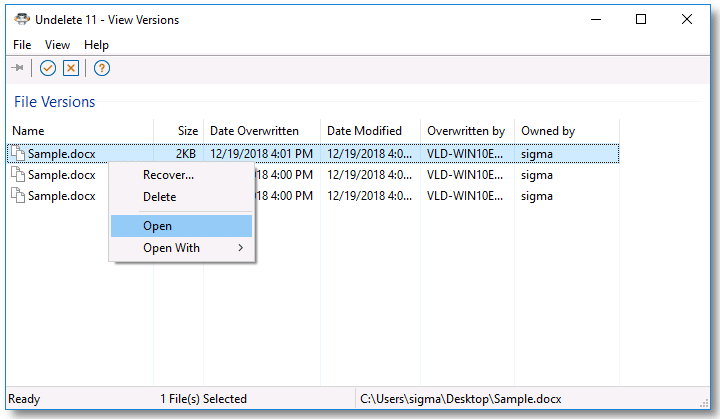
An individual version can be viewed prior to recovery, or deletion, by opening it with its associated Windows application. This is done by:
- Double-clicking a selected file version, or by
- Right-clicking the file copy and choosing Open, or by choosing Open With > Choose Program, to select the application used to open the file copy.
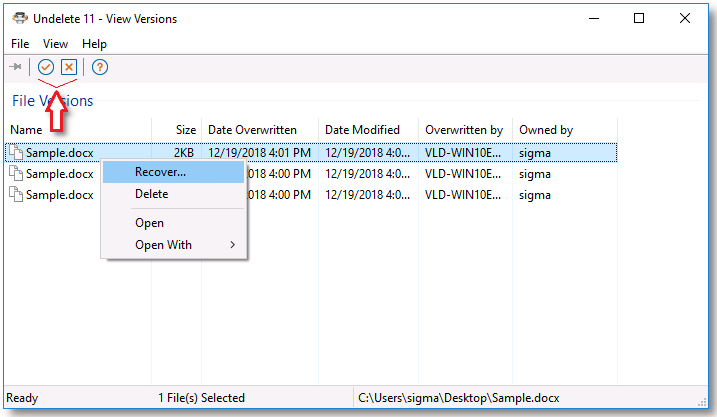
A selected version can be recovered by:
- Right-clicking and choosing Recover, or by
- Clicking the check icon below the menus:
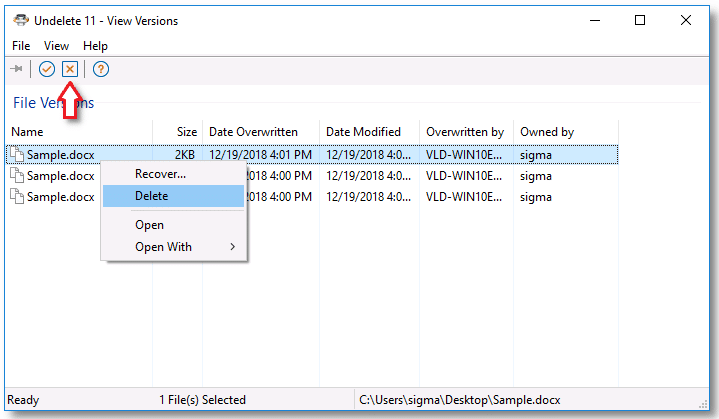
Similarly, a selected version can be deleted by:
- Right-clicking and choosing Delete, or by
- Clicking the X icon below the menus:
Using Emergency Undelete
Undelete Server include Emergency Undelete, a unique tool used to recover accidentally deleted files and directory folders before you’ve installed the full Undelete product. Note: Emergency Undelete is only included in the paid version of Undelete and is not included in the free trial.
Since the installation of any software can overwrite accidentally deleted files, Emergency Undelete runs directly off a removable storage media (such as a CD-ROM or thumb-drive), installing no files at all onto your disk drive. The operation of Emergency Undelete is similar to running the Search feature in either of Undelete. You should place the EmergUnd.exe file on removable storage media (such as a CD-ROM or thumb-drive) in the appropriate drive or attached to your computer before running the program.
Follow these steps to recover a file with Emergency Undelete:
- Locate the EmergUnd.exe file on your removable storage media (such as a CD-ROM or thumb-drive) and double-click it.
- Enter the name of the file you want to undelete in the Name: field of the Emergency Undelete display. You can use wildcard characters (such as *.doc or *.*) if you don’t recall the name of the file. Note that on FAT volumes, deleted files with short names (8.3 format) will have the first character of the filename replaced by a tilde (~). For example, a file named test.txt, when deleted, will be renamed to ~est.txt and will be displayed that way in the Emergency Undelete windows:

- Enter the letter of the drive you want to search in the Location: field of the Undelete display. You can optionally enter a directory folder name (such as D:\My Documents). Use the Browse button to see the drives and folders on your computer.
- Click Search. This starts the search for deleted files.
- Once the search is complete, highlight the name of the file (or files) you want to undelete.
- Click Undelete Files…. This causes a new dialog box to be displayed.
- Enter the drive letter and directory folder name of the location where you want the undeleted file to be written in the Path: field. You can use the Browse button to navigate to the desired location. If you have more than one disk volume, be sure to specify a volume other than the one where the file was originally located. This prevents the new, recovered file from overwriting portions of the old, deleted file.
- Click OK. The file(s) you have selected will be recovered if possible and written to the location you have specified.
Important Tips for using Emergency Undelete:
Once a file is deleted, the chances of fully recovering that file decrease considerably when other activity occurs on the same disk volume. To improve the possibility of a complete recovery of a file that has been accidentally deleted, Condusiv Technologies recommends the following steps:
- Stop all activity on the disk volume where the accidentally deleted file resided. Do not save any files that are currently open, since this causes a write operation on the disk.
- If the computer is on a network, disconnect the network cable if possible. This prevents disk activity caused by remote users from writing over the file you want to recover. (Keep the network cable connected if you want to recover the file to a disk volume on a remote computer.)
- After Emergency Undelete has located the file, recover the file to a local or remote disk volume other than the volume from which the file was recovered. This prevents the deleted file from accidentally being written over by the write operation of the recovery process.
Note: On FAT volumes, files with short names (8.3 format) that have really been deleted will have the first character of the filename replaced by a tilde (~). For example, a file named test.txt, when deleted, will be renamed to ~est.txt and will be displayed that way in the Emergency Undelete windows.
Using SecureDelete
There may be times when, due to corporate security policies or personal preference, you need or want files to be completely erased. The SecureDelete feature in Undelete provides this capability. When enabled, SecureDelete not only deletes the file, but it overwrites the disk space the file previously occupied, thereby removing any remaining traces of the file left on the disk. This is done by overwriting it with a specific bit pattern specified for this purpose by the National Security Agency (NSA) for the Department of Defense (DOD). Finally, after the file has been overwritten, it is deleted. The SecureDelete procedure makes it virtually impossible for anyone to access sensitive file data from a disk after it has been deleted from the Recovery Bin.
The SecureDelete option can be set to securely overwrite files and purge them from all Recovery Bins, or just as they are deleted.
SecureDelete options are accessible by clicking the Settings menu, and selecting the Properties icon in the Ribbon bar.
The Global Settings tab contains SecureDelete options that affect all Recovery Bins on the system:
- Enable Recovery Bin SecureDelete on purge – Enables SecureDelete to securely overwrite files as they deleted from individual volumes. Turn on this setting to allow the SecureDelete feature to be available for Individual drive volume Recovery Bins. Note that when this is enabled, all individual Recovery Bins will be set to SecureDelete files from their volumes from that point forward. The SecureDelete feature can be disabled as needed on individual Recovery Bins however.
- SecureDelete all files immediately – Immediately SecureDelete all files in all Recovery Bins. This action is not reversible. Once the cycle has completed, even the Search feature will not be able to recover files.
When both the Enable Recovery Bin SecureDelete on purge setting and the Each volume has its own Recovery Bin setting are enabled in Global Settings, this option becomes available to set. When active, it is turned on by default. It will cause the permanent erasure of any file deleted on the selected drive volume. The deleted file will not appear in the Recovery Bin or in the free space of the disk—rendering it completely unrecoverable. Use this feature only when absolutely required, as it does involve a performance hit.
The User may turn the SecureDelete feature on or off for each Drive Volume as desired by setting the “SecureDelete files on this drive” check box under each Drive Volume tab.
Note: SecureDelete relies on Undelete having sufficient permissions to write to the disk volume on which the files reside. In cases where Undelete does not have write permission, the file will be simply deleted in the normal fashion. However, the Wipe Free Space feature does not have this limitation and can “clean” areas of the disk volume that SecureDelete might not.
Similarly, the ribbon icon under the Tools tab provides a similar security feature that can be applied to all the free space on a chosen disk volume. This feature can be also set to automatically wipe free space on a per drive basis by setting the “Enable Automatic Wipe Free Space” check box under each Drive Volume tab.
Note: Wiping free space can sometimes take a while, and progress will be shown in the graphic at the top of the Drive Settings page and on the graphic in the main drive listing.
Using Wipe Free Space
The Wipe Free Space feature can be used manually and automatically.
Automatic Wipe Free Space
Enable this option for each drive:
Settings menu > Properties ribbon icon > set the “Enable Automatic Wipe Free Space” check box in each Drive Volume tab as desired.
This keeps the free space clean by wiping on a periodic basis going forward. Auto-Wipe Free Space will overwrite free space on the selected volume with a specific bit pattern, making it virtually impossible to recover any data that may reside in the free space. It leaves the Recovery Bin intact and functioning and wipes the free space clean.
Manual Wipe Free Space Ribbon Icon
If you want to manually initiate a Wipe Free Space cycle for a given volume without having to wait for the next automatic cycle to start, click the Wipe Free Space ribbon icon under the Tools menu.
Select a volume from the drop down menu and Undelete will begin wiping the free space of the selected volume immediately. Wiping free space can sometimes take a while to complete; a spinner will be shown in the upper right of the screen to let you know it is still working.
To see the status of any current or past Wipe Free Space job, click the Wipe Free Space pull-down located right below the Wipe Free Space ribbon icon and select Show Wipe Free Space Status. This will show in-progress jobs as well as any completed jobs.
Using Undelete Server Exclusion and Inclusion Lists
The Recovery Bin Exclusion and Inclusion Lists give you very complete, yet flexible control over what files are included and excluded from Recovery Bin processing. You can specify disk volumes, folders, individual files, or a particular file type you want included or excluded. Or, you can create custom inclusion and exclusion rules to fit a wide range of needs.
Exclusion List
Use the Recovery Bin Exclusion List to create a list of directory folders, files, and file types that you do not want to be processed by the Undelete Recovery Bin. When a deleted file (or the folder where it is stored) is excluded from the Recovery Bin, it really is deleted from the disk—not moved to another location on the disk (as other files normally are) when Undelete is running.
One example of a file type you would likely exclude from Recovery Bin processing are temporary files that you really do want to delete. These are often files with a .tmp file extension, but many other extensions are also used, depending on the applications you are running. A number of common temporary file types are excluded from Recovery Bin processing by default.
Typically, when you install an application, a number of temporary files are created, and then eventually deleted by the installation program. Also, compilers and Web browsers often create a large number of temporary files. There may be little chance you will ever need to recover these temporary files, so by excluding them from being processed by the Recovery Bin, the program really will delete them, and they won’t take up Recovery Bin space unnecessarily.
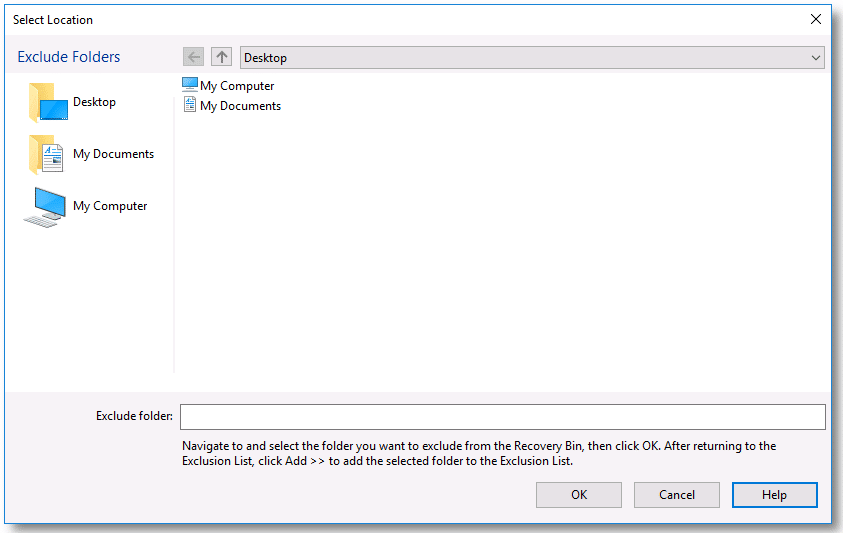
How to create entries for the Exclusion List:
To set options for the Exclusion list, click the Exclusion List ribbon icon in the Settings menu.
The default Exclusion List contains a number of file extensions, folder locations and Windows folders locations already excluded from Undelete processing.
The Exclusion List options vary depending on the type of exclusion being created.
To Exclude Volumes, Folders or Files:
- Select Volumes, Folders and Files from the Type pull down menu.
- From the Look in pull down menu, select the starting location to exclude from (Desktop, My Computer, or My Documents).
- If choosing My Computer, you can navigate to specific drives or sub-folders by double-clicking My Computer and navigating until you have selected starting point to exclude from.
- You can check the “Also exclude subfolders of selected folder” check box if desired to also exclude all folders and files below the highlighted folder.
- Multiple folders can be selected at one time by holding the Shift or Control keys.
- Click the Add button to add the new exclusion to the Exclusion List.
- Click OK.
To Exclude a Specific File Extension:
- Select File Extension (File type) from the Type drop down menu.
- Select the specific Volume you want the file type exclusion to apply.
- Click one or more file extensions from the list (Shift and Control work as usual). If the extension you want to exclude is not in the list, click the “Enter new” entry at the top of the list, and enter the file extension with a starting period followed by the desired file extension (e.g., .123). Enter an optional Description of the file extension, and then click OK. Highlight the newly added file extension.
- Click the Add button to add the file extension to the Exclusion List.
- Click OK.
To Create a Custom Exclusion
This option allows the User to create more flexible exclusions than the above Volume, Folder, File, or File Extension exclusions can.
Custom allows the User to specify specific volume, folder, file names and file extensions, as well as the starting folder or subfolder, and whether it applies to everything below the folder or not.
For example: Exclude all files with a *.123 file extension but only within all subfolders beneath C:\MyFolder.
To create a custom exclusion:
- Select Custom from the Type pull down menu.
- Choose from the following options from the I want to exclude pull down menus:
Files
Folders
Volumes
With the file extension (click the List button or fill in the file extension directly)
With the file name
With the full name
From the Folder
From the subfolder
From all folders
From all folders below
From the subfolder and all folders below
Fill in the path to the folder or click the Browse button to select the folder location to exclude by choosing one of the location options on the left such as My Computer. For My Computer, click the volume you want to exclude, or double-click a volume to navigate down to the desired sub-folder, then click OK:
From the volume (select the volume from the pull down menu)
From all volumes
And finally click the bottom pull down menu to select the volume to exclude from.
- Click the Add button to add the custom exclusion to the Exclusion List.
- Click OK.
To Remove an Exclusion from the List
An existing exclusion can be removed from the list by highlighting the exclusion and then clicking the Remove button, and then clicking Apply or OK.
Inclusion List
Use the Recovery Bin Inclusion List to create a list of volumes, folders, files, and file types that you specifically, and exclusively, want to be processed by the Undelete Recovery Bin.
This is a new feature for this version of Undelete designed to make it easier for Users who want to have the Recovery Bin operate only for specific volumes, folders, files, or file types.
The User will be asked to confirm any entries added into the Inclusion List due to the exclusive nature of the feature.
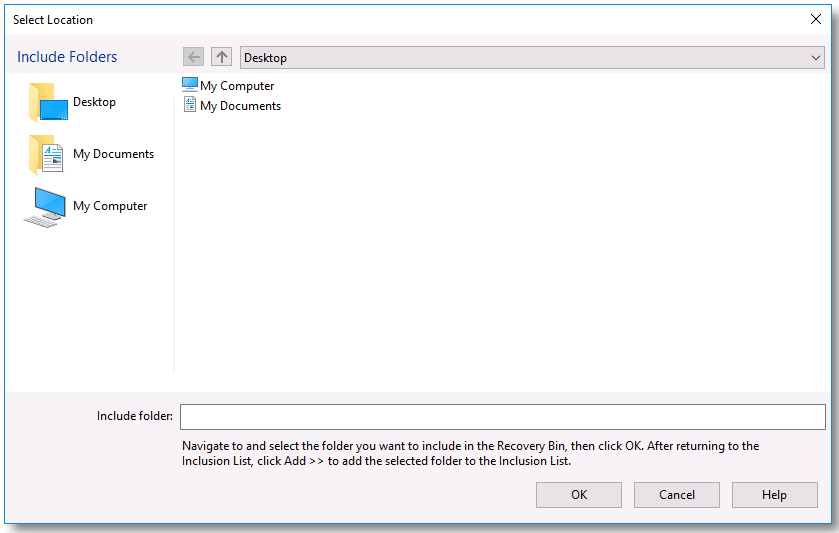
To access the Inclusion List, click the Inclusion List ribbon icon in the Settings menu.
To set options for the Inclusion List, click the Inclusion List ribbon icon in the Settings menu.
The default Inclusion List is empty.
The Inclusion List options vary depending on the type of inclusion being created.
To Include Volumes, Folders or Files:
- Select Volumes, Folders and Files from the Type pull down menu.
- From the Look in pull down menu, select the starting location to include from (Desktop, My Computer, or My Documents).
- If choosing My Computer, you can navigate to specific drives or sub-folders by double-clicking My Computer and navigating until you have selected starting point to include from.
- You can check the “Also include subfolders of selected folder” check box if desired to also Include all folders and files below the highlighted folder.
- Multiple folders can be selected at one time by holding the Shift or Control keys.
- Click the Add button to add the new inclusion to the Inclusion List.
- Click OK.
To Include a Specific File Extension:
- Select File Extension (File type) from the Type drop down menu.
- Select the specific Volume you want the file type inclusion to apply.
- Click one or more file extensions from the list (Shift and Control work as usual). If the extension you want to include is not in the list, click the “Enter new” entry at the top of the list, and enter the file extension with a starting period followed by the desired file extension (e.g., .123). Enter an optional description of the file extension, and then click OK. Highlight the newly added file extension.
- Click the Add button to add the file extension to the Inclusion List.
- Click OK.
To Create a Custom Inclusion
This option allows the User to create more flexible inclusions than the above Volume, Folder, File, or File Extensions inclusions can.
Custom allows the User to specify specific volume, folder, file names and file extensions, as well as the starting folder or subfolder, and whether it applies to everything below the folder or not.
For example: Include all files with a *.123 file extension but only within all subfolders beneath C:\MyFolder.
To create a custom inclusion:
- Select Custom from the Type pull down menu.
- Choose from the following options from the I want to include pull down menus:
Files
Folders
Volumes
With the file extension (click the List button or fill in the file extension directly)
With the file name
With the full name
From the Folder
From the subfolder
From all folders
From all folders below
From the subfolder and all folders below
Fill in the path to the folder or click the Browse button to select the folder location to include. Choose one of the location options on the left such as My Computer. For My Computer, click the volume you want to include, or double-click a volume to navigate down to the desired sub-folder, then click OK:
From the volume (select the volume from the pull down menu)
From all volumes
And finally click the bottom pull down menu to select the volume to include from.
- Click the Add button to add the custom inclusion to the Inclusion List.
- Click OK.
To Remove an Inclusion from the List
An existing inclusion can be removed from the list by highlighting the inclusion and then clicking the Remove button.
Important Notes:
- Adding items to the Inclusion List will automatically exclude everything not in the list for the selected volume.
- Inclusion List features are not available in the Undelete Desktop Client.
Additional Information
Check for Updates
The first time you run Undelete, it automatically checks to see if a more recent version of Undelete is available. If so, you are given the option to download and install the newer version. When the download screen is displayed, click Run this program from its current location to begin installing the update. Or, click Save this program to disk to save the Undelete update installation package on your computer for later installation. (To install an update stored on your computer in this manner, simply double-click the file you download and follow the instructions displayed.)
You can check for Undelete updates any time you want. Use the Check for Updates option in the File menu to see if a newer version of Undelete is available:
Registering Undelete
Undelete purchases made after July 2020 are automatically registered and you do not need to do any additional registration steps.
The “Register” link within the Undelete software user interface is inactive.
A Note about Repairing Your Windows System
Performing an emergency repair of a Windows system can possibly change or disable certain system information or services. For this reason, it may be necessary to reinstall Undelete after repairing your Windows system.
A Note About Firewalls
As a normal part of its operation, Undelete acts as a server on your network. If you are running a hardware or software firewall, you may see messages indicating Undelete is trying to act as a server. These messages are expected; you can safely allow these events.
You may also be notified that Undelete is trying to access the Internet. It is important to note that Undelete does not access the Internet (except when you specifically use the Check for Updates feature), but it does use Windows mechanisms that may trigger these alerts from your firewall. Again, these messages are expected and you can safely allow the events.
About the Undelete Service
Undelete is primarily designed as a “Set It and Forget It”® file recovery system. In order to accomplish this goal, it creates a Windows service. The service allows Undelete to run in the background while other applications are running.
After installation, the Undelete service starts automatically each time your Windows system is started. The Undelete service runs all the time, whether or not Undelete is in use. This service consumes negligible system resources. It must be running for Undelete to save deleted files in the Recovery Bin and for the Undelete user interface to operate correctly.
Important Points
Here are several important points about using Undelete:
- When you install Undelete, it will take the place of any other file recovery utilities currently installed on your computer. This includes the Windows Recycle Bin as well as third party products that perform similar functions.
- Where security is of concern, the Recovery Bin Properties can be set to completely erase files that are deleted from the Recovery Bin, using the SecureDelete option.
- Long filenames might be shortened to the DOS 8.3 file naming convention when files are deleted from the Windows command prompt and recovered with Undelete.
- You can right-click a file in the Recoverable Files list and perform a variety of functions, including:
-
- Recover… (to Original Location or Somewhere Else)
-
- Delete
-
- Exclude (Exclude File or Exclude File Type–only available in Server and Professional Editions)
-
- View Copies
-
- Open
-
- Open With (Choose Program)
- In keeping with NTFS file security, you must have sufficient file permissions and ownership to recover a file from the Recovery Bin.
- You can adjust the size of the Recovery Bin(s) on the system via the Settings menu > Properties ribbon icon. If Each drive has its own Recovery Bin has been selected under the Global Settings tab, then the sizes for each Recovery Bin are set under the individual drive tabs. If Use one Recovery Bin for all drives has been selected under the Global Settings tab, then the size of the Recovery Bin is set under the Common Bin tab, along with its full path location.
- By default, when the Recovery Bin reaches the size you have specified, it is automatically partially purged to make room for newly deleted files. For this reason, files that were once stored in the Recovery Bin can become no longer available from the Recovery Bin. This default behavior can be changed in the Recovery Bin Properties Global Settings tab, including disabling a fixed sized Recovery Bin when the Bin fills up.
- If a file of the same name exists in the “deleted” file’s previous location, the “deleted” file is recovered, but with a “version number” added before the file extension. Because of this capability, multiple files of the same name can be recovered.
Part 3: How to Do Specific Tasks with Undelete Server
How to Recover a File Across the Network
So you’ve deleted a file from a network file server (or another computer on your network) and now you need to get the file back. What should you do next?
There are several ways to recover the file, depending on the Undelete edition you are using. (Keep in mind the computer from which the file was deleted must also be running Undelete Server or Undelete Professional.)
If you are using Undelete Server Edition, Undelete Professional Edition or Undelete Desktop Client, you can simply connect to the network folder the file was deleted from using the Connect Network Folder feature described below.
After connecting to the remote folder, you can recover the file as if it were deleted from your local computer. Follow the steps above under “Using the Undelete Server Recovery Bin to Recover Files” for additional information about recovering a file from the Recovery Bin.
How to Search Recovery Bin
Recovery Bins can house many thousands of files so it can be helpful to be able to search a Recovery Bin for specific files when you don’t know which Recovery Bin folder the file(s) reside in.
The Search Recovery Bin feature allows the User to search for files by name and folder location.
The User can optionally narrow the search by:
- Adding the date the files were created or deleted, and/or
- Adding the names of the Users who owned or deleted the file(s)
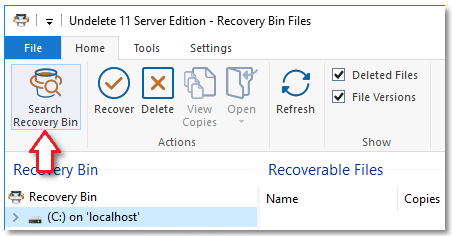
To use the Search Recovery Bin feature:
- Click the Search Recovery Bin ribbon icon in the Home menu:
- Fill in the Name field with as much of the filename(s) information as possible. Wild card characters (* and ?) can be used if desired:
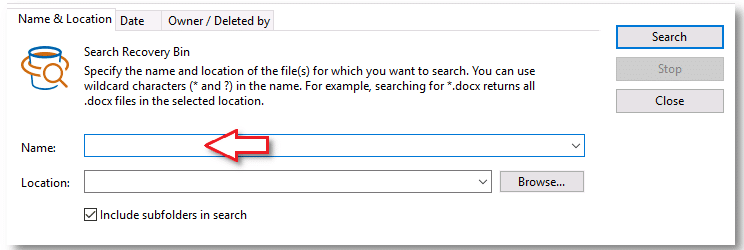
- Fill in the Location field as the place to start the folder search from. Clicking the Browse button will bring up the folder tree view where you can navigate and highlight a folder to start the search from. If you don’t know what location to start from, choose the root of the volume (e.g., C:).
In most cases it’s beneficial to keep the “Include subfolders in search” check box checked:

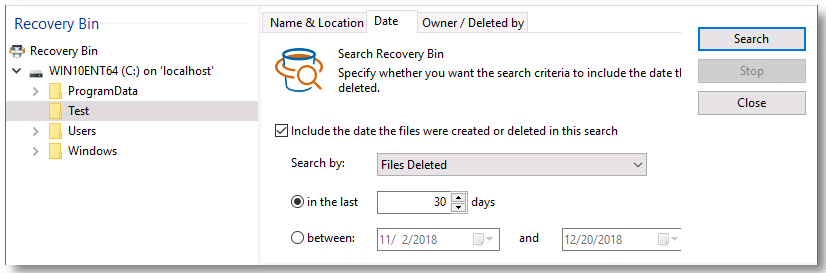
To also include the Date the files were created or deleted in the search criteria:
-
- Click the Date tab.
-
- Check the Include the date the files were created or deleted in this search check box. Select either Files Created or Files Deleted in the Search by drop down menu, and choose either in the last number of days, or between two dates.
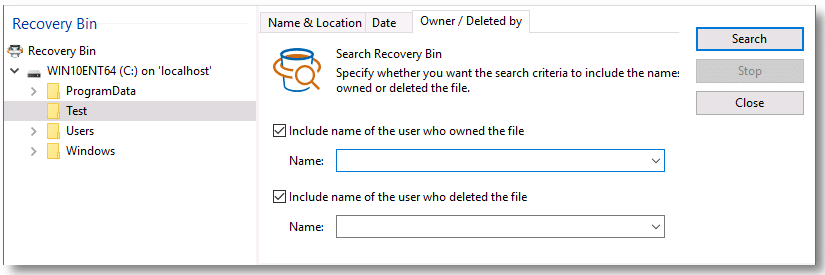
To also include the names of the Users who owned or deleted the file(s):
-
- Click the Owner / Deleted by tab.
-
- Check the Include name of the user who owned the file check box if you want to select the name of the User who owned the file(s) from the Name drop down menu; and/or
-
- Check the Include name of the user who deleted the file check box if you want to select the name of the User who deleted the file(s) from the second Name drop down menu.
Once all search criteria has been entered, click the Search button to start the search.
While the search is in progress the User will have the option of clicking the Stop button to stop the search.
Search results will be displayed in the Recoverable Files area.
How to Change the Recovery Bin Properties
Use the Settings menu > Properties ribbon icon to access the Recovery Bin Properties and Settings.
Within the Recovery Bin Properties dialog box, you can manage the settings for individual drive volume Recovery Bins or common Recovery Bins.
This includes:
- Global Settings that apply to all Recovery Bins – Individual Recovery Bins versus a Common Recovery Bin; SecureDelete all files immediately; enable/disable Recovery Bins; sizing rules for Recovery Bins; enable/disable the saving of deleted zero length files; enable/disable Recovery Bin Virus Protection; enable/disable the ability to turn on SecureDelete on purge for Recovery Bins; enable/disable the “Confirm each delete from the Recovery Bin” warning.
- Versions – Enable/disable saving of file versions; specify the number of versions saved per file; specify the file type extensions that will be saved in the Recovery Bin as versions.
- Common Bin – Specify the location of the Common Bin; specify its size; enable/disable feature to purge files older than a specified number of days.
- Individual drive volume Recovery Bin settings – Enable/disable Bins; set Recovery Bin size; enable/disable feature to purge files older than a specified number of days; enable/disable Automatic Wipe Free Space feature.
Global Settings Tab
- Each volume has its own Recovery Bin or Use one Recovery Bin for all volumes – Set whether each drive volume has its own Recovery Bin or whether a common Recovery Bin is used for all volumes.
- SecureDelete all files immediately – Enabling this and clicking OK will cause Undelete to run SecureDelete immediately on all files in all Recovery Bins. This action is not reversible. Once the cycle has completed, even the Search feature will not be able to recover files.
- Enable Recovery Bin on newly detected volumes – This is turned off by default.
- Turn off Recovery Bin on all volumes – There may be times when the User wants to temporarily turn off all Undelete Processing of deleted files. This is the setting to do that.
- Automatically Resize Recovery Bin based on free space – Turned on by default to best support the changing nature of free space on User systems.
- Make Recovery Bin a fixed size – Turned off by default. When enabled, it has two mutually exclusive options: Auto Purge when Bin becomes full and Disable Recovery Bin when Max Size is reached. Additionally, when this is turned on the option to also Display Recovery Bin Full warnings is available.
- Do not save zero length files – Turned on by default. There are times when the Operating System and applications will create a files that do not have any contents in them—such as temporary files. Not saving these files to the Recovery Bin saves time and processing overhead.
- Enable Recovery Bin Virus Protection – Turned on by default.
- Enable Recovery Bin SecureDelete on purge – Turned off by default. Turn on this setting to allow the SecureDelete feature to be available for Individual drive volume Recovery Bins. Note that when this is enabled, all individual Recovery Bins will be set to SecureDelete files from their volumes from that point forward. The SecureDelete feature can be disabled as needed on individual Recovery Bins however.
- Enable Automatic Wipe Free Space – Turned off by default to reduce processing overhead. Useful on secure systems that have to maintain a high level of security for deleted files. The wiping of free space will prevent the Search feature from being able to locate deleted files that are not in the Recovery Bin.
Versions Tab
- Enable saving of file versions in the Recovery Bin – Turned on by default. Allows the saving of designated file types as changes are made to an opened file during Saves.
- Limit each file to – Set to 5 by default.
- Save versions of these selected file types – By default, Microsoft Office file types for Microsoft Word, Excel, and PowerPoint are included, and additional file types can be added as desired.
Common Bin Tab
- Specify the Volume and Full Path where you want the Recovery Bin to be located – When the Use one Recovery Bin for all volumes setting in the Global Settings tab is enabled, the Volume pull down menu and Path fields become available to be set. The Path field needs to have the Full Path to the Common Bin specified.
- Recovery Bin will automatically resize to [X] percent of free space – Defaults to 20 percent, and can be adjusted up to 80 percent using the scroll controls or by changing the horizontal slider control.
- Purge files older than X days – Turned off by default but can be set to the desired number of days. When enabled, defaults to 7 days.
Individual Drive Volume Tabs

- Enable a Recovery Bin on this volume – This setting may be enabled by default if the User did not change the setting during the Undelete product installation. When enabled, saves files deleted from the selected drive so that they can be recovered at some point in the future. This applies to the individual Recovery Bin associated with this drive. This Recovery Bin may also be functioning as the Common Recovery Bin if this drive has been selected as the location for the Common Recovery Bin.
- Recovery Bin will automatically resize to [X] percent of free space – Defaults to 20 percent, and can be adjusted up to 80 percent using the scroll controls or by changing the horizontal slider control. This setting is only applicable when Automatically Resize Recovery Bin based on free space is selected in Global Settings. As the amount of available free space changes on the volume, so will the space used by the Recovery Bin. Undelete will automatically purge older files from the Recovery Bin as necessary.
- SecureDelete files on this volume – When the Enable Recovery Bin SecureDelete on purge setting is enabled in Global Settings this option becomes available to set. When active, it is turned on by default. It will cause the permanent erasure of any file deleted on the selected drive. The deleted file will not appear in the Recovery Bin or the free space of the disk—rendering it completely unrecoverable. Use this feature only when absolutely required, as it does involve a performance hit.
- Purge files older than X days – Turned off by default. When enabled, defaults to 7 days. Use this option to control when files will be purged from the Recovery Bin. If a file in the Recovery Bin is more than the specified number of days old, it will be purged. This setting applies to both Auto-Size and Fixed-Size Recovery Bins.
- Save files deleted from Macintosh shares – Turned on by default. This option causes files deleted from SFM shares to be saved in the Recovery Bin (as long as the file is not on the Exclusion list). When this option is not enabled, files from Windows Services for Macintosh (SFM) shares are not saved in the Recovery Bin. We recommend leaving it enabled unless deletion performance on SFM shares is critical to your operation.
Using SFM, it is possible to make one or more shared folders or disks visible to Macintosh computers on your network. Special actions are required by Undelete to save files deleted from these shares. The actions needed to copy these files into the Undelete Recovery Bin involve more work and time than a normal file deletion, and thus Macintosh file deletions from SFM served shares may take more time. There is no impact to local files deleted from the Macintosh or to files on non-SFM shares on the server.
- Enable Automatic Wipe Free Space – Turned off by default. Useful on secure systems that have to maintain a high level of security for deleted files. Enable this option to keep the free space clean by wiping on a periodic basis going forward.
Auto-Wipe Free Space will overwrite free space on the selected volume with a specific bit pattern, making it virtually impossible to recover any data that may reside in the free space. It leaves the Recovery Bin intact and functioning, and wipes the free space clean.
The wiping of free space will prevent the Search feature from being able to locate deleted files that are not in the Recovery Bin.
Note: Recovery Bin Properties is not available in the Undelete Desktop Client.
How to Prevent Files From Being Moved to the Recovery Bin
The Recovery Bin Exclusion and Inclusion Lists give you very complete, yet flexible control over what files are included and excluded from Recovery Bin processing. You can specify disk volumes, folders, individual files, or a particular file type you want included or excluded. Or, you can create custom inclusion and exclusion rules to fit a wide range of needs.
Exclusion List
Use the Recovery Bin Exclusion List to create a list of directory folders, files, and file types that you do not want to be processed by the Undelete Recovery Bin. When a deleted file (or the folder where it is stored) is excluded from the Recovery Bin, it really is deleted from the disk—not moved to another location on the disk (as other files normally are) when Undelete is running.
One example of a file type you would likely exclude from Recovery Bin processing are temporary files that you really do want to delete. These are often files with a .tmp file extension, but many other extensions are also used, depending on the applications you are running. A number of common temporary file types are excluded from Recovery Bin processing by default.
Typically, when you install an application, a number of temporary files are created, and then eventually deleted by the installation program. Also, compilers and Web browsers often create a large number of temporary files. There may be little chance you will ever need to recover these temporary files, so by excluding them from being processed by the Recovery Bin, the program really will delete them, and they won’t take up Recovery Bin space unnecessarily.
Inclusion List
Use the Recovery Bin Inclusion List to create a list of directory folders, files, and file types that you specifically, and exclusively, want to be processed by the Undelete Recovery Bin.
This is a new feature for this version of Undelete designed to make it easier for Users who want to have the Recovery Bin operate only for specific volumes, folders, files, or file types.
The User will be asked to confirm any entries added into the Inclusion List due to the exclusive nature of the feature.
Important Notes:
- Adding items to the Inclusion List will automatically exclude everything not in the list for the selected volume.
- Exclusion List and Inclusion List features are not available in the Undelete Desktop Client.
How to Push Install Undelete Across a Network
About PushInstall
Use the Undelete PushInstall feature to install or uninstall Undelete Desktop Client, Professional Edition or Server Edition on selected computers throughout your network. Note that you must have valid Undelete licenses for the machines on which you intend to install Undelete.
You must have Administrator access on all the selected computers to PushInstall Undelete to Windows XP and newer Windows Operating systems. If necessary, the PushInstall program will prompt you to enter login credentials for the machine(s) to which you are PushInstalling.
Note: The Undelete PushInstall feature only installs or uninstalls Undelete on machines in the same domain as the Undelete Server from which it is run. In other words, you must use PushInstall within a single domain. For Active Directory systems, it is recommended to use group policy to remotely install or uninstall.
The PushInstall feature establishes a network connection with the selected machines, then installs the selected Undelete edition to those computers. It relies on having the installable Undelete package(s) available to be installed. The first time you use the PushInstall feature, the program attempts to detect the installable files. If they cannot be found, you will see a dialog box prompting you for the location of the installation package. You can use either a CD-ROM or downloaded installation package. Once you choose the Setup.exe file, the installation package is copied to a storage area used by the PushInstall program.
If you try to PushInstall an Undelete version that is not compatible with the target machine, a message explaining the situation is displayed. Messages are also displayed to let you know the status of the installations.
Before the PushInstall operation begins, you will see a message asking you to confirm the version and build numbers of the installable package.
When PushInstalling the Undelete Desktop Client, you also have the option to have an Orientation screen displayed on the remote computer (for your users’ benefit) explaining how to use it. This helps familiarize your users with the Undelete Desktop Client and shows them how to use it to recover their own deleted files from the file server running Undelete.
Running PushInstall
Follow these steps to install or uninstall Undelete Desktop Client, Undelete Professional Edition or Undelete Server Edition to remote computers on your network:
- From the Windows Start menu, select Programs, then Undelete PushInstall.
- A welcome screen is displayed. Click Next to continue.
- If necessary, the PushInstall program will prompt you to enter login credentials for the machine(s) to which you are PushInstalling.Enter a username and password for an account that is a member of the Administrators (or Domain Administrators) group for the domain on which you are installing or uninstalling Undelete.
- Once the PushInstall process has started, messages are displayed showing you the status of the operation.
How to Connect to a Network Folder
To connect to Recovery Bin content for a network share, select Connect Network Folder from the Tools menu.
When you use this option, a dialog box will open where you must enter some basic information in order to connect to and display a network share.
In the Display as field, enter a name you want displayed in the Recovery Bin tree Folders pane.
In the Path field, enter the network path of the folder to which you want to connect, or click the Browse button to navigate to the folder.
To connect using a different user name, click the Connect As button and specify the User name and Password to be used to connect to the Network Share.
Click the OK button to connect.
To remove a Network Folder connection listed in the Recovery Bin folder view, click the Disconnect Network Folder icon in the Tools menu. A list of existing Network folder connections will appear. Choose the one you wish to disconnect from and click the OK button.
Important Notes:
- Undelete Server or Professional must also be running on the remote computer.
- You must have sufficient file permissions to access the Recovery Bin content on the remote computer.
How to Connect to a Remote Computer
Note: This option is only available with Undelete Server version. It requires that the User be logged in with a Domain account that has permissions to access the Remote Computer.
Use the Connect to Remote Computer icon in the Tools menu to recover files and manage Recovery Bins on remote network computers. (Note: Undelete Server or Professional must also be running on the remote computer.)
When this option is used, you will be presented with a dialog where you may choose a domain, subsequently, the list in the dialog will populate with the computers that are detected on your network. Select the computer that you would like to connect to and then click OK.
After connecting, you can recover files from the remote Recovery Bin, use the Search feature, as well as change the remote Recovery Bin properties.
When you are finished recovering files on the remote computer, click on the Connect to Remote Computer pull down and select Disconnect.
How to Disconnect from a Network Folder
To disconnect a network folder share, right-click on the folder representing the network share that you would like to disconnect from in the Folders tree view area on the left side of the User Interface, and select Disconnect Network Share.
Alternatively, click the Disconnect Network Folder ribbon icon under the Tools menu, and select the Network Folder that you want to disconnect from, and click OK.
How to Delete a File from the Recovery Bin
There are several ways to delete one or more selected file(s) from the Recovery Bin:
- Press the Delete key on your keyboard, or
- Right-click on the selected file(s) in the Recoverable Files list and choose Delete, or
- Click the Delete ribbon icon in the Home menu.
In all cases the User will have to confirm that they really wish to delete the file(s) from the Recovery Bin.
Notes:
- When you use this option, the disk space where the previously deleted files were stored is marked as available for storage of new or modified files.
- You might be able to recover files that have been deleted from the Recovery Bin, by using the Search option. Keep in mind, though, that once the space where a file is stored is marked as available, there is the possibility that the space will be overwritten with new data as files are created or modified on the disk. The Search feature may not be able to recover all of a file(s) after it has been wholly or partially overwritten.
How to Empty the Recovery Bin
Use the Empty Recovery Bin ribbon icon located in the Tools menu to remove all the files from the Recovery Bin.
After the Recovery Bin is emptied, the disk space where the deleted files were stored is marked as available for storage of new or modified files.
You might be able to recover files that have been deleted from the Recovery Bin, by using the Search option. Keep in mind, though, that once the space where a file is stored is marked as available, there is the possibility that the space will be overwritten with new data as files are created or modified on the disk. The Search feature may not be able to recover all of a file(s) after it has be wholly or partially overwritten.
Buy Undelete Server software here.
Download 30-day Undelete Server trial here.


Leave A Comment
You must be logged in to post a comment.